Part 1 - Setting up Postman with the Jamf Pro API

Setting up Postman
Postman is a widely used software application designed for API testing and development. It offers a user-friendly interface for sending HTTP requests to APIs and receiving their responses.
With Postman, macadmins can manage collections of API requests, organise these requests into folders, and automate their testing workflows with Jamf Pro.
To get started you will need to setup an account to use Postman. You can either use the web application or download the application* (its really just a web wrapper app) here.
Create your workspace
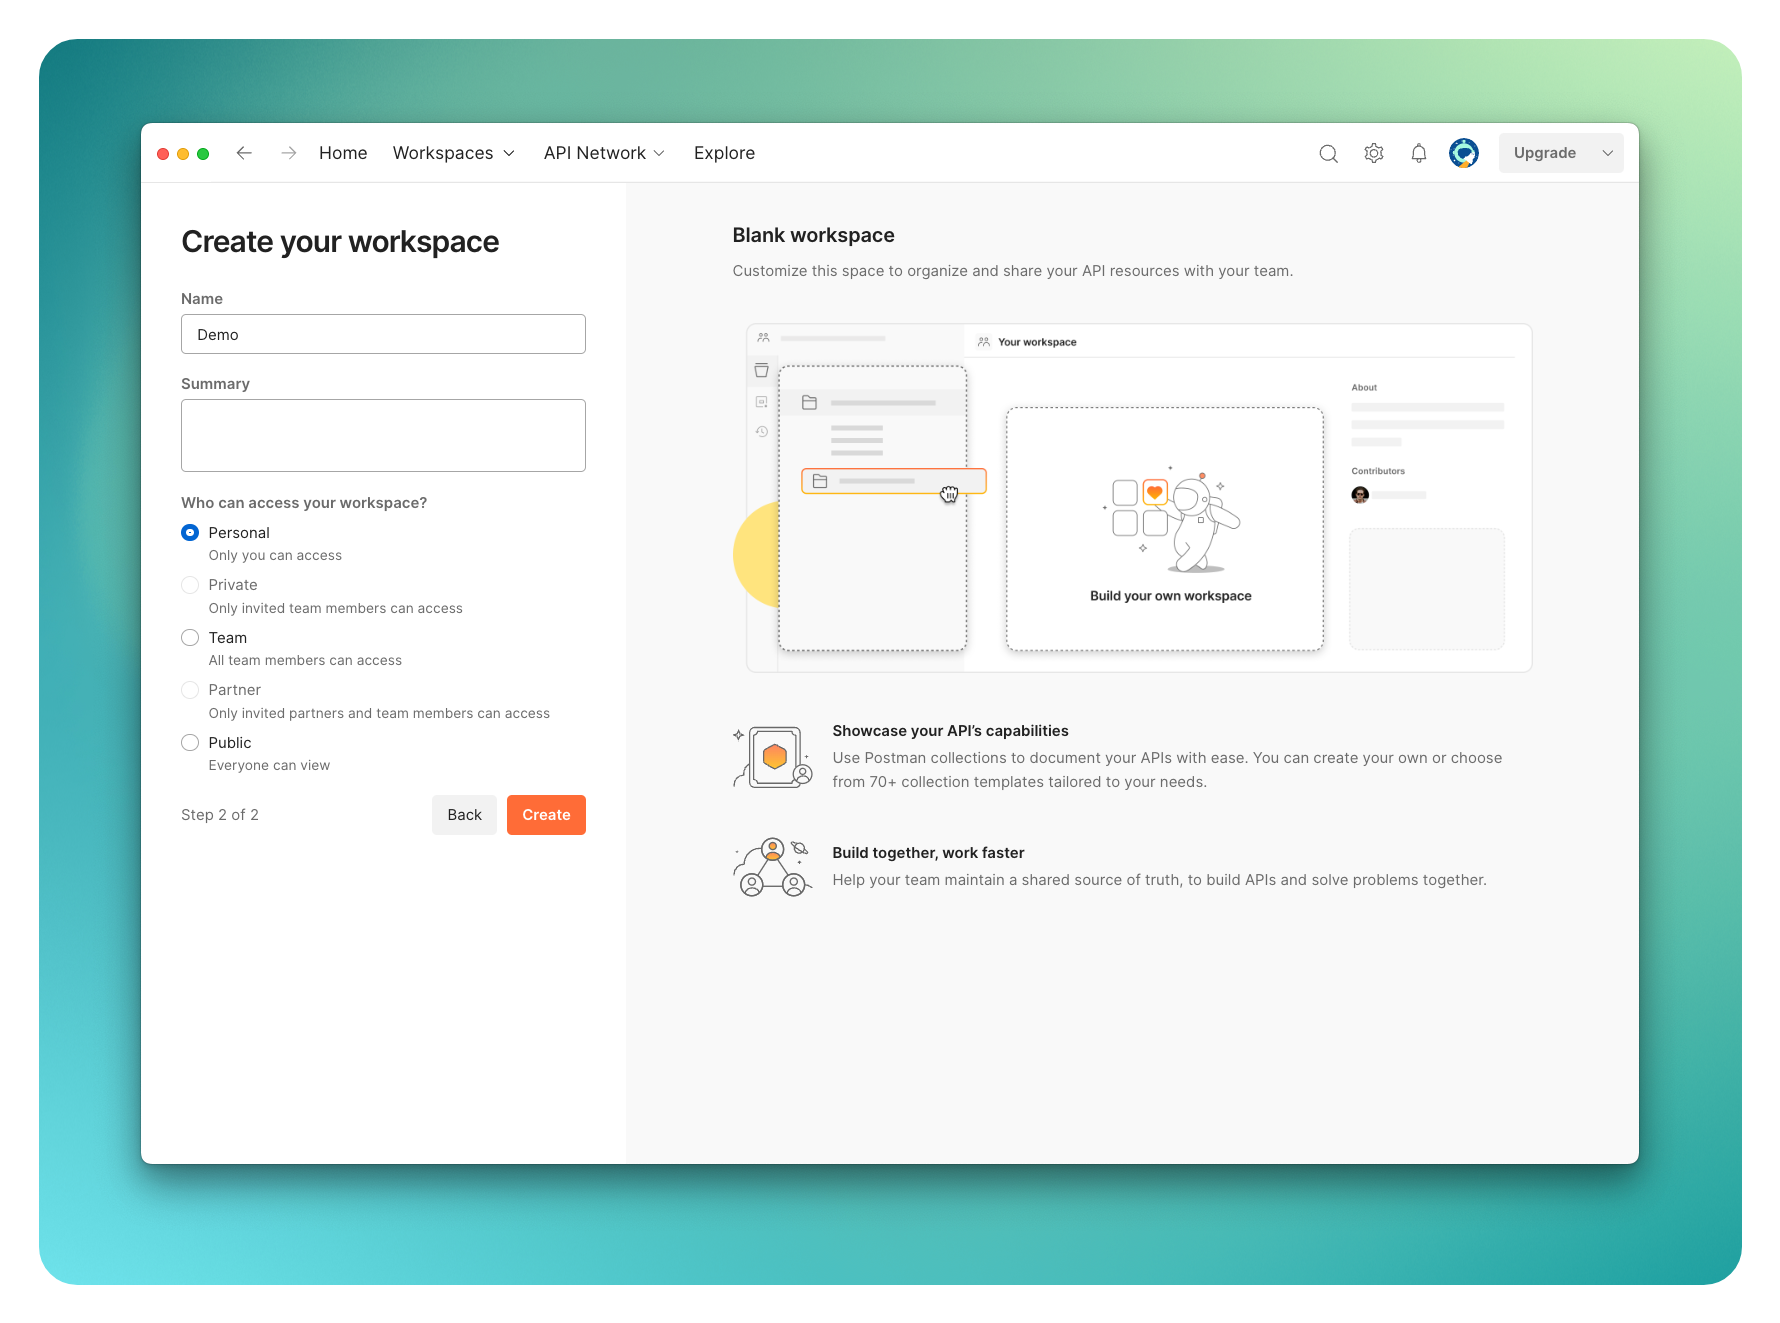
The first steps after setting up your account is to create a workspace. Set your new space to Personal, but if you are a paid user, you might have some more options to share this workspace.
Once you have a workspace setup, we need to get the Jamf Pro API imported. Postman calls this a collection. They allow you to group related API elements, making it simpler to edit, share, test, and reuse them.
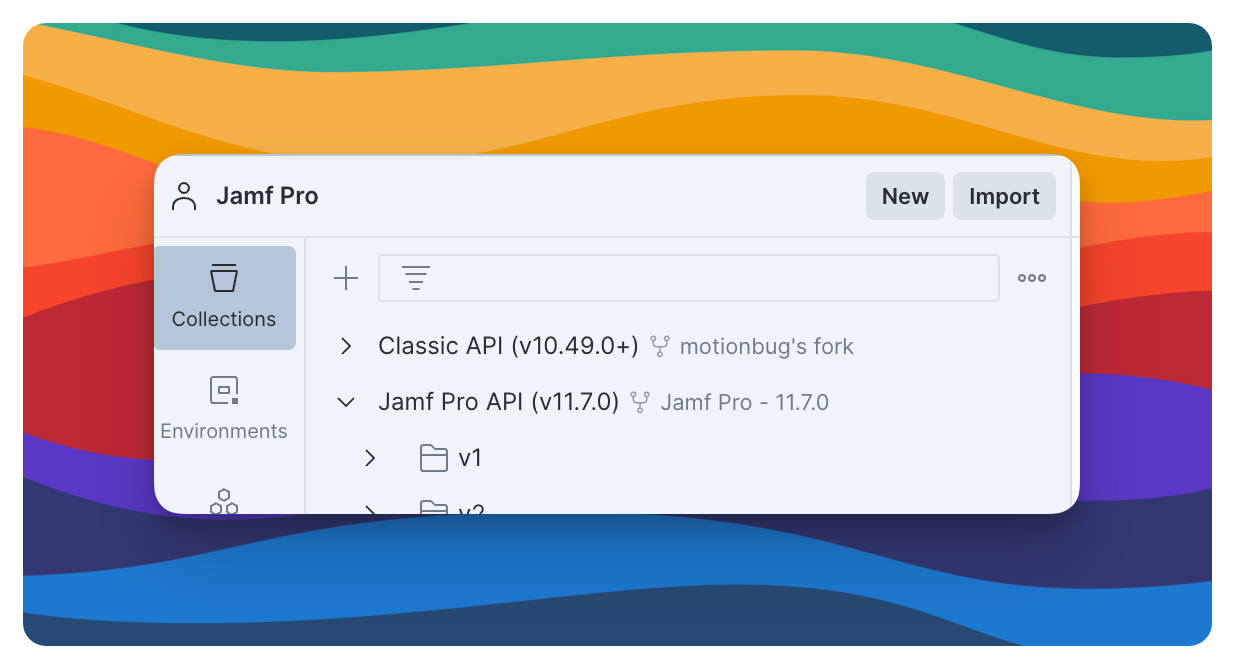
The easiest way is to just fork from the official repository called Jamf Collections and for this post we will be using the Jamf Pro API (v11.x)
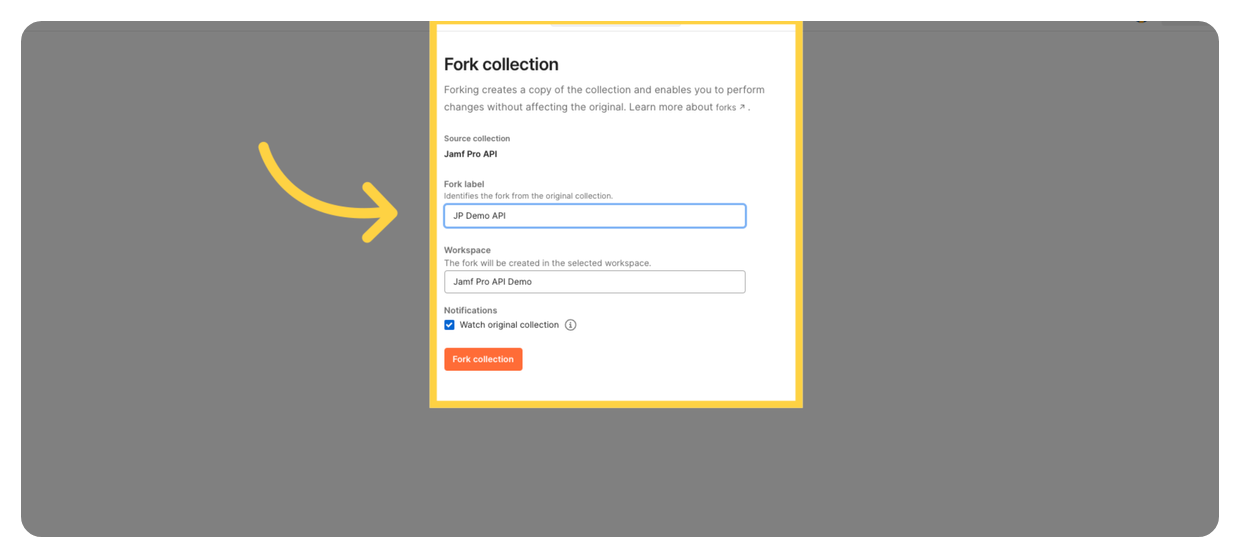
— insert image for forked page
Creating an environment
An environment is a set of variables you can use in your Postman requests. You can use environments to group related sets of values together.
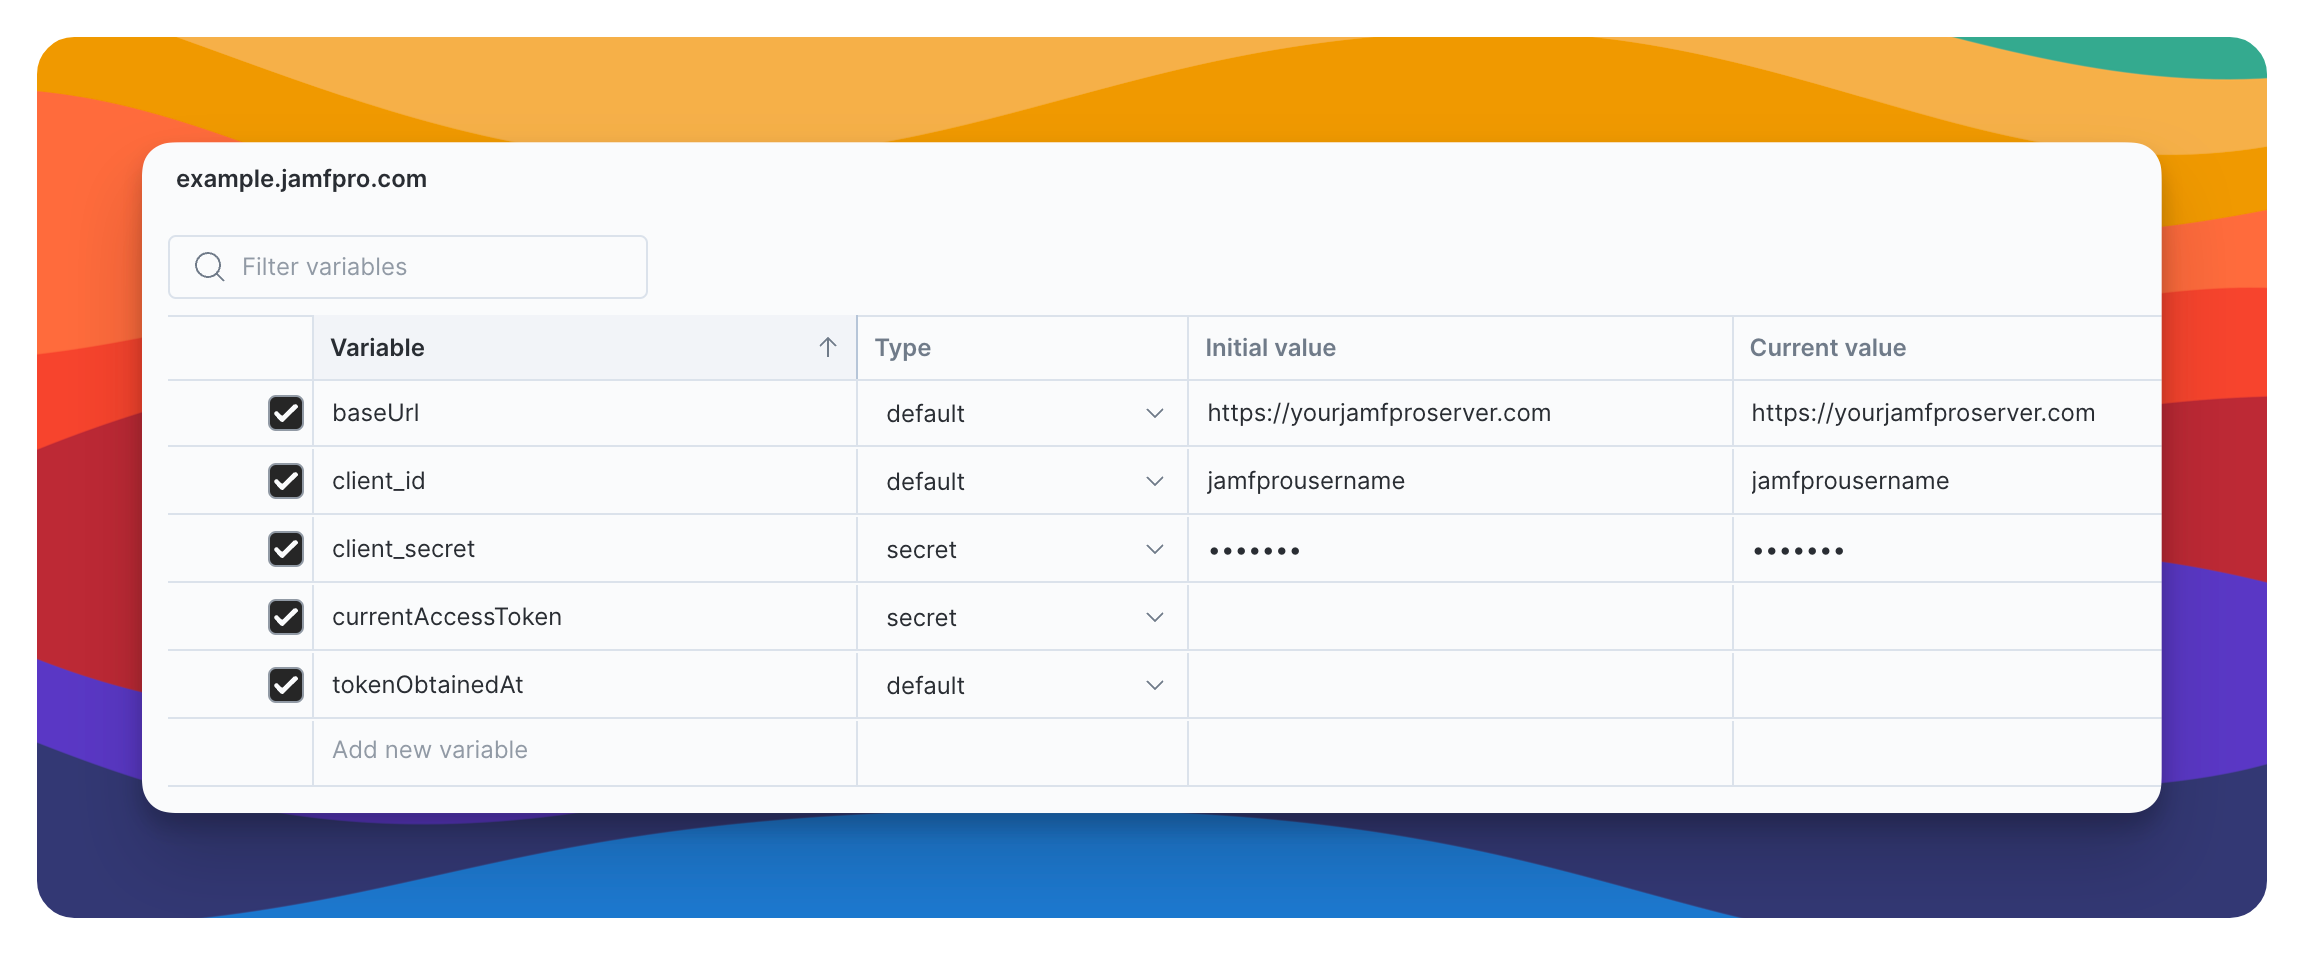
Needed Variables
When setting up an environment we need to add the following variable to the table:
| Variable | Type | Initial value | Current value |
|---|---|---|---|
| baseUrl | default | https://jamfpro_url.com/api | https://jamfpro_url.com/api |
| client_id | default | Jamf Pro API Username | Jamf Pro API Username |
| client_secret | secret | Jamf Pro API Password | Jamf Pro API Password |
| currentAccessToken | secret | ||
| tokenObtainedAt | default |
- baseUrl - Jamf Pro API
- client_id - Jamf Pro API Username
- client_secret - Jamf Pro API Password
- currentAccessToken - leave blank
- tokenObtainedAt - leave blank
Since each Jamf Pro server will have its own environment variables, we only need one forked Jamf Pro API collection.
Once we have our environment setup, we need to setup our authorisation pre-script. This script will use the environment client_id and client_secret to get an access token from the environment Jamf Pro server.
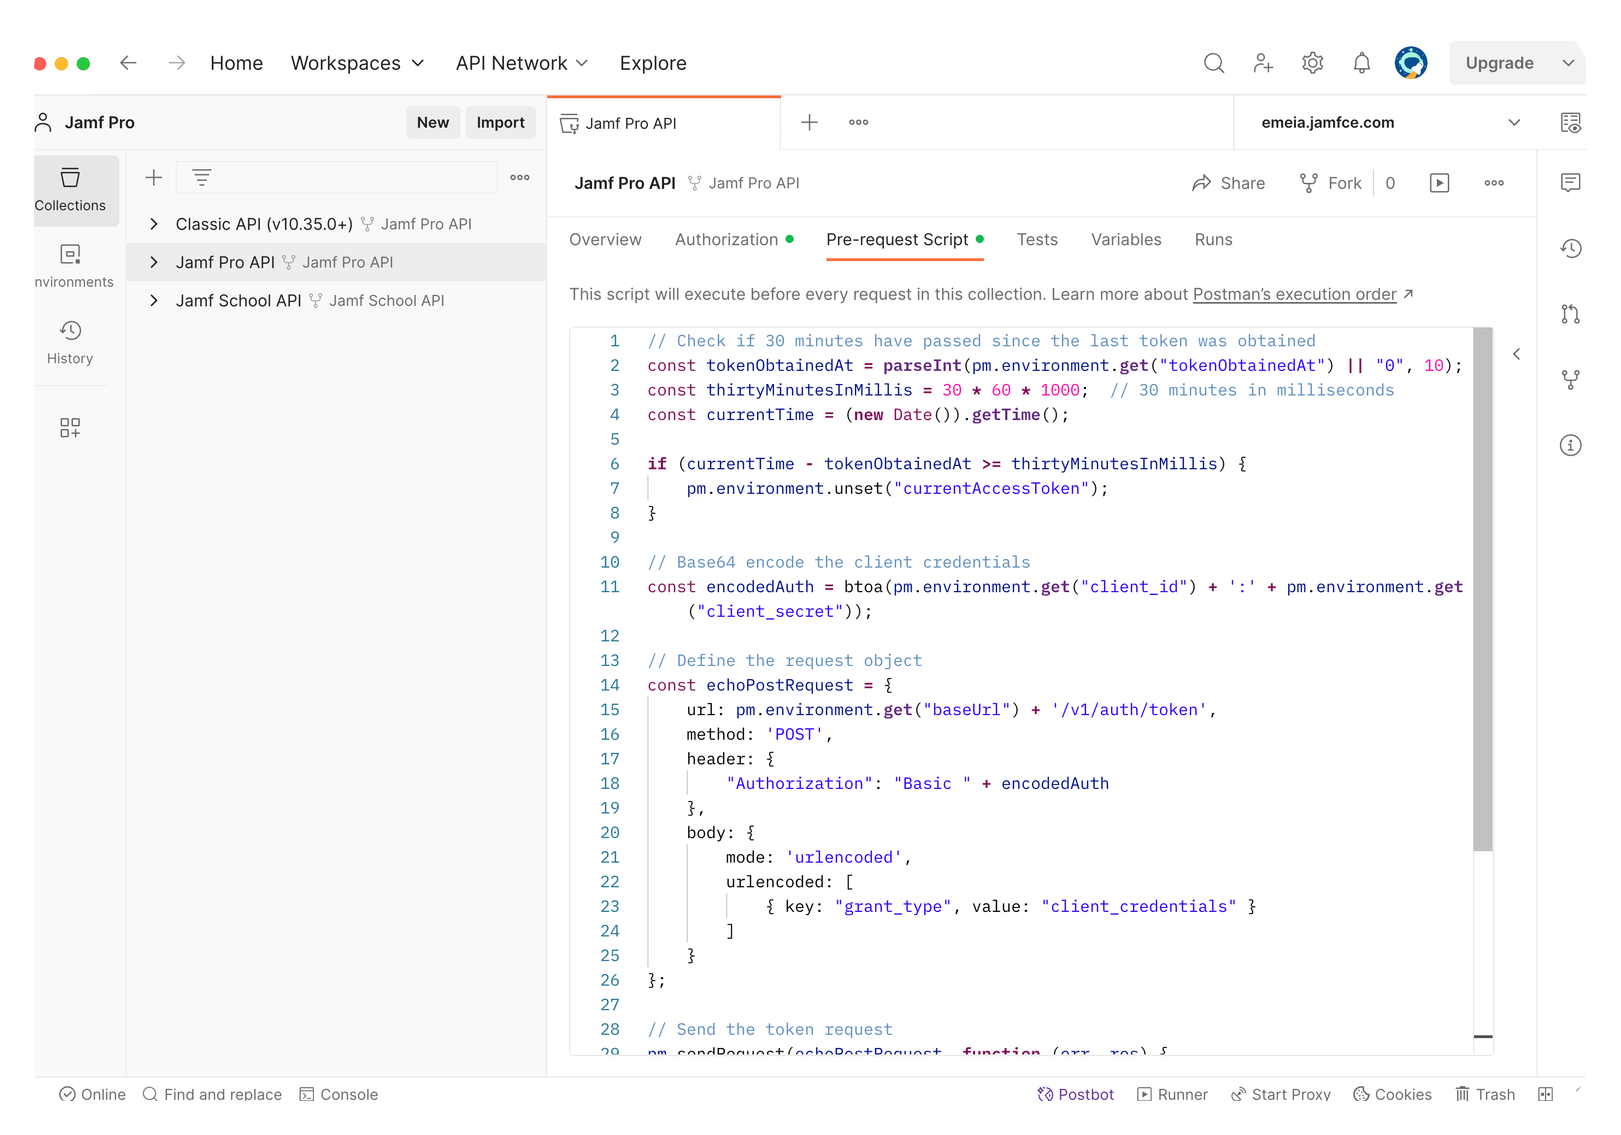
Setting up the pre-script
Navigate to collections -> Jamf Pro API (v.11.x) and you should on the right-hand side have Overview when selected, but select Authorization

Once Authorization is selected, we need to set the type of authorization and our variable {{currentAccessToken}} from our environment.
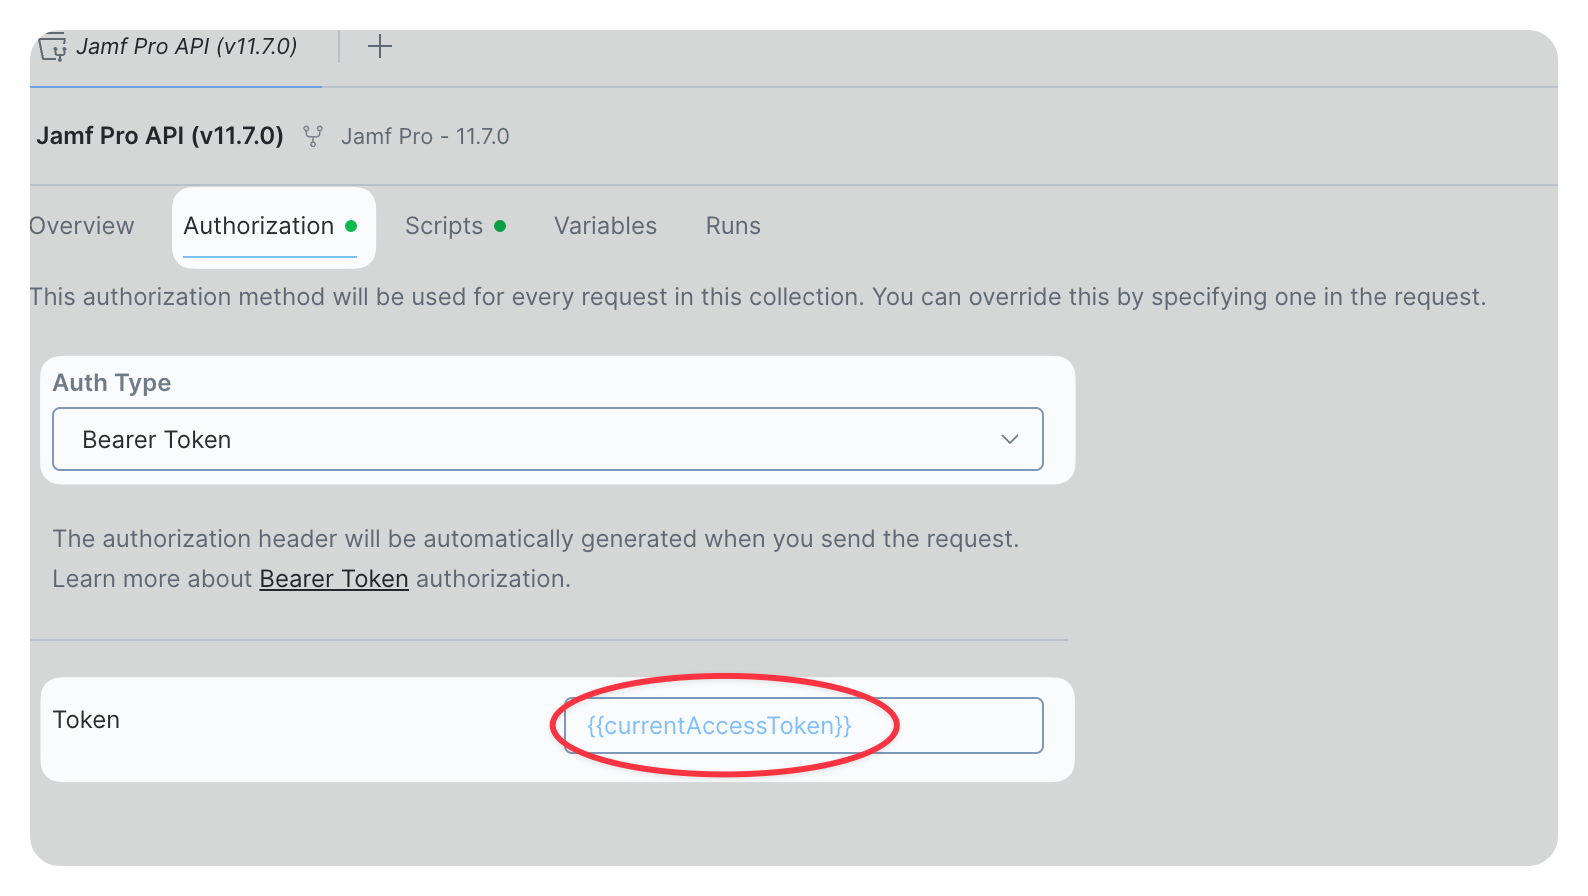
Once we have our type of Authorization set with the right variable, we can now add the pre-request script that will execute first before running any API test meaning we will have an authorization token before our REST API request.
Within the pre-request script we have all the variables we set in our environment, meaning this will work with different Jamf Pro hosts.
Review with the following script:
// Check if 30 minutes have passed since the last token was obtained
const tokenObtainedAt = parseInt(pm.environment.get("tokenObtainedAt") || "0", 10);
const thirtyMinutesInMillis = 30 * 60 * 1000;  // 30 minutes in milliseconds
const currentTime = (new Date()).getTime();

if (currentTime - tokenObtainedAt >= thirtyMinutesInMillis) {
    pm.environment.unset("currentAccessToken");
}

// Base64 encode the client credentials
const encodedAuth = require('btoa')(pm.environment.get("client_id") + ':' + pm.environment.get("client_secret"));

// Define the request object
const echoPostRequest = {
    url: pm.environment.get("baseUrl") + '/v1/auth/token',
    method: 'POST',
    header: {
        "Authorization": "Basic " + encodedAuth
    },
    body: {
        mode: 'urlencoded',
        urlencoded: [
            { key: "grant_type", value: "client_credentials" }
        ]
    }
};

// Send the token request
pm.sendRequest(echoPostRequest, function (err, res) {
    if (err === null && res.code === 200) {
        console.log('Saving the token');
        const responseJson = res.json();
        pm.environment.set('currentAccessToken', responseJson.token);
        // Save the current time as the token obtained time
        pm.environment.set("tokenObtainedAt", currentTime.toString());
    } else {
        console.error("Error obtaining token:", err || res.json());
    }
});
Copy and paste the above script and add this to the Pre-request tab.
Testing to see if this works!
Navigate to the following node within the Jamf Pro API, open:
v1 -> jamf-pro-version -> Return information about the Jamf Pro including the current version
Click Send and we should get a status 200 OK and a nice JSON response with the version of our Jamf Pro server.
{
    "version": "11.x"
}
If you get a different response then there is something wrong, check to make sure the client_id and client_secret are correct and have the proper privileges.
If you are still getting an error navigate to your Jamf Pro Server and access the API via the web; https://jamfproserver.com/api/ and click View under the Jamf Pro API
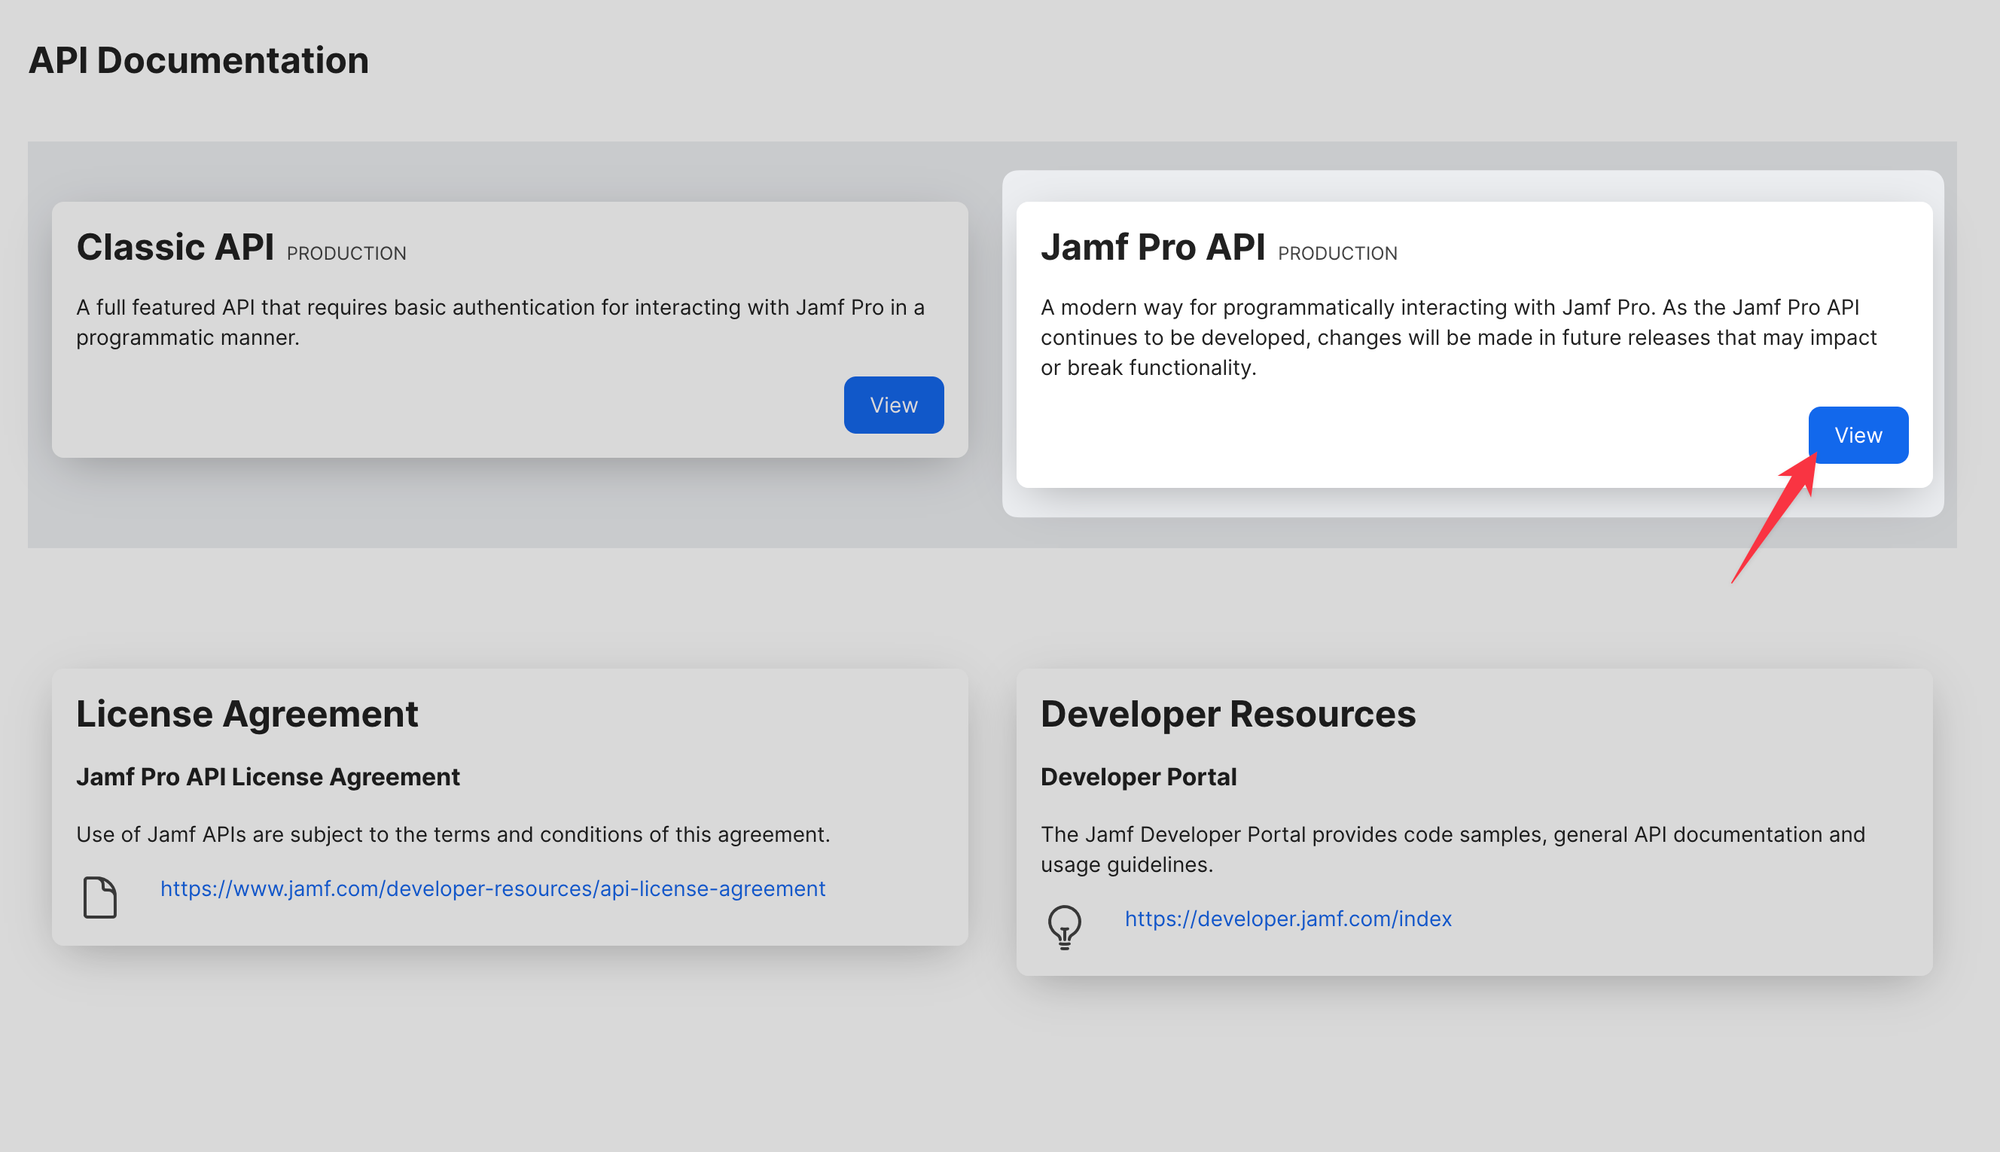
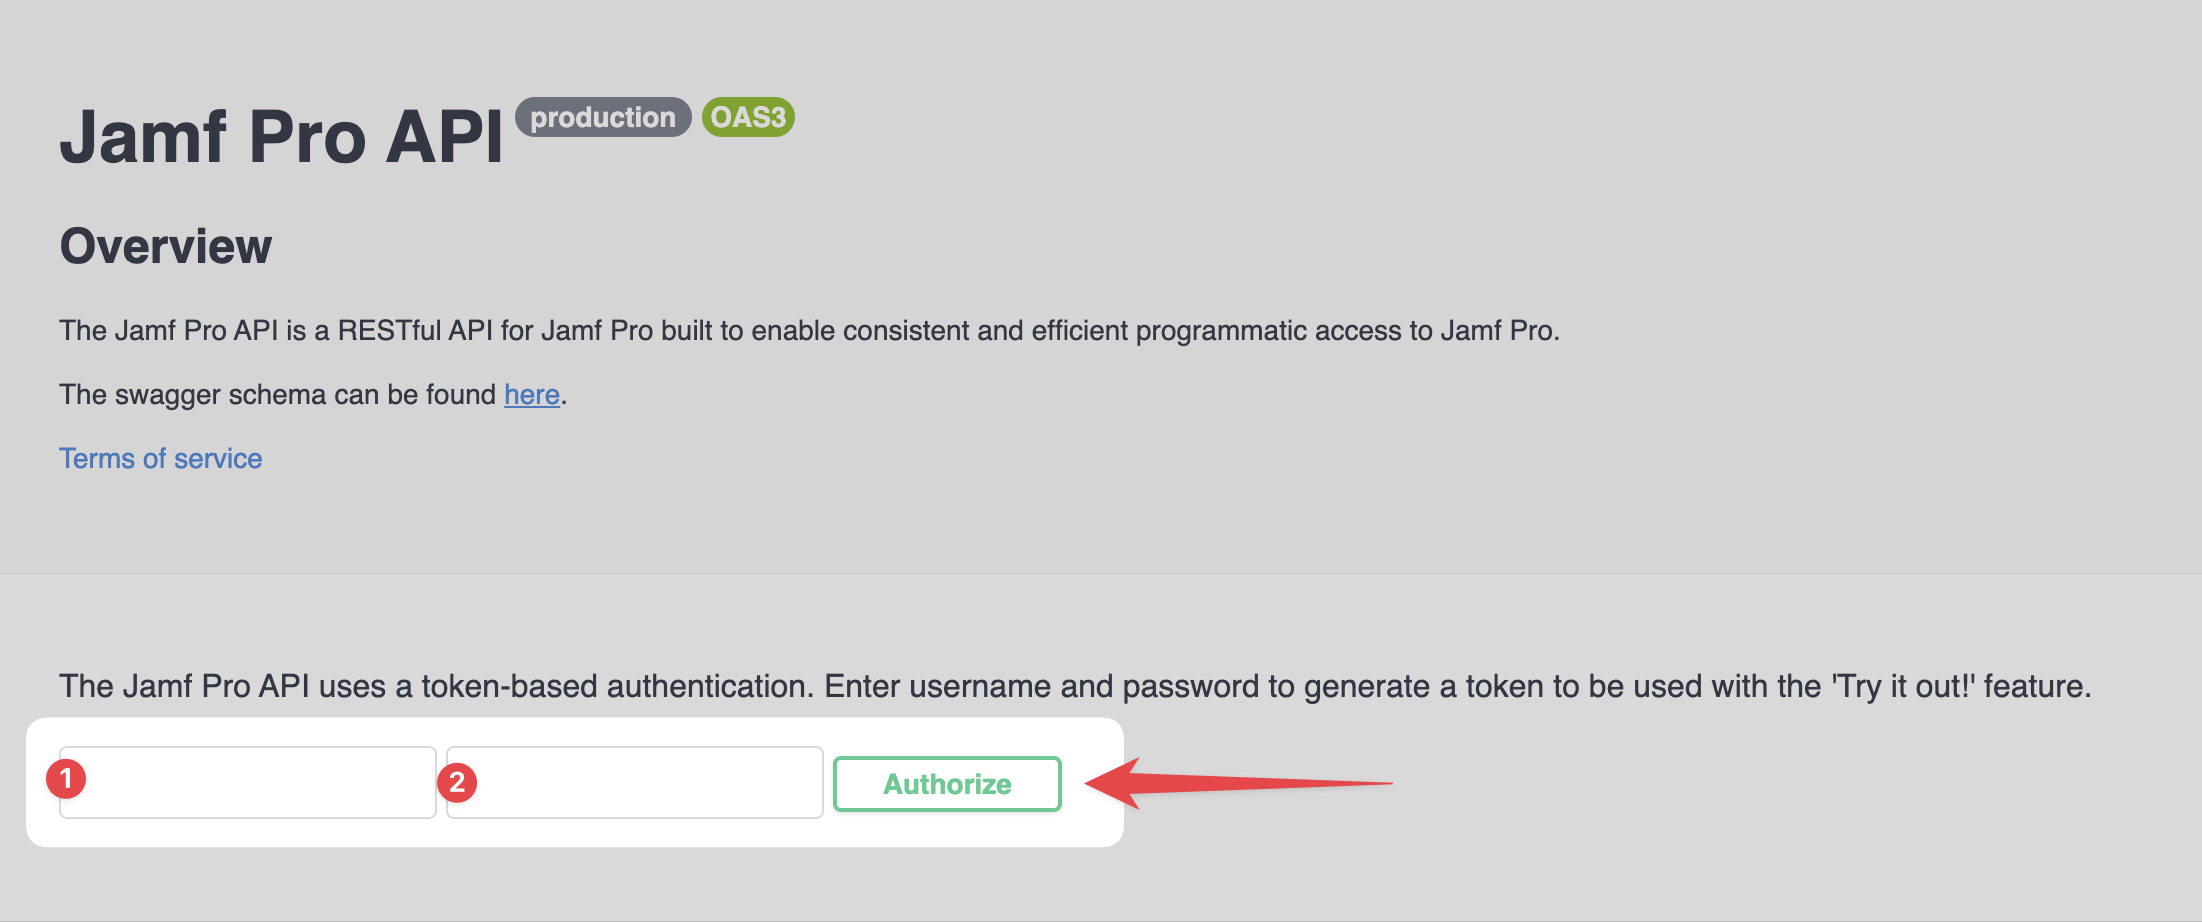
Once the page is loaded, please add the 1️⃣ client_id and 2️⃣ client_secret and click Authorize.
If this works, then there is something with your setup within Postman and please start again with this tutorial, double checking all your variables. If you still can't get it to work, you can message me on #macadmins
Coming soon!
Part II - Using Postman Flows with the Jamf Pro API